
Anyone who owns a WordPress site wants to block bots and spam messages, which are quite annoying. These spammers and bots make various comments and attacks without realizing the number of visitors or hits of the website. It is very easy to get rid of this with the reCAPTCHA plugin offered by Google to its users. It is offered %100 free by Google to anyone who wants to use this plugin. It will be very useful for users to install this plugin on WordPress web pages.
Users can start by downloading the Site Key and Secret Key values in the reCAPTCHA plugin from Google reCAPTCHA and installing them on their pages. Users who acquire these keys can add the reCAPTCHA plugin, which will ensure the security of their pages, to their login and contact forms with a few steps. The steps users will follow to:
Step 1 – Plugin installation: To access the reCAPTCHA plugin, go to the WordPress admin panel then Plugins / Add New / Search Box and enter Google Captcha (reCAPTCHA) in here. Then you’ll see the plugin in here. After that install the plugin. After the installation is completed, the necessary arrangements are made by accessing the plugin via BWS Panel / Google Captcha.
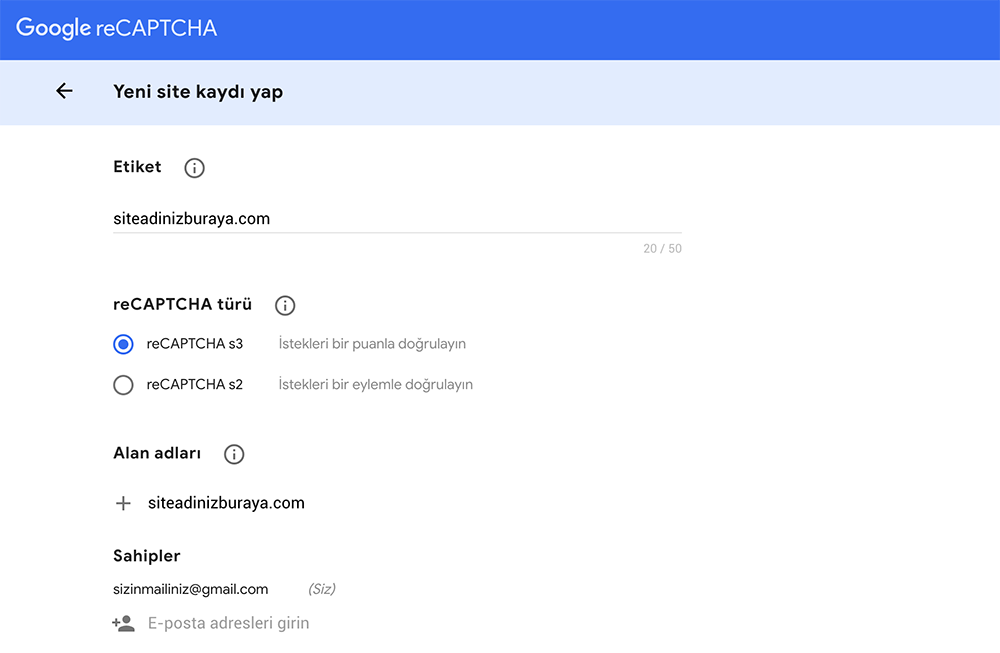
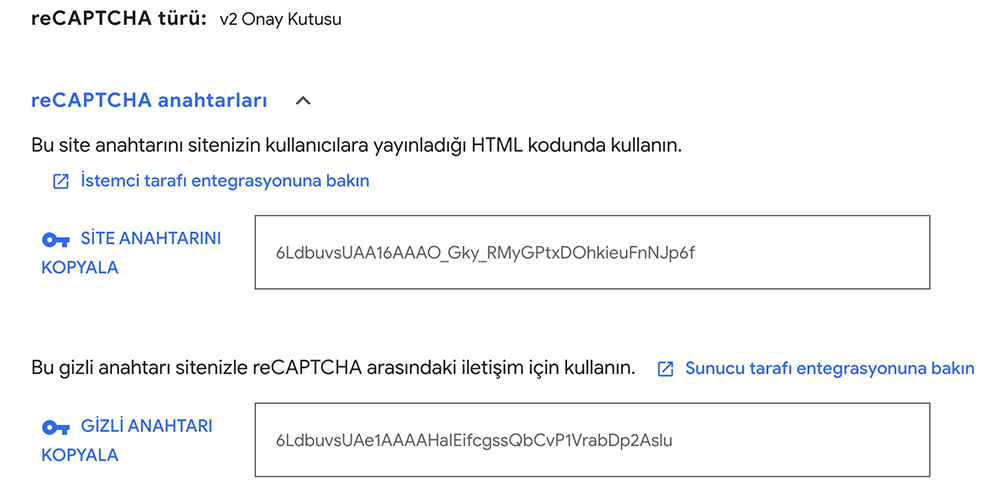
Step 2 – Registration to Google reCAPTCHA plugin: Click here to access Site Key and Secret Key keys, and users log in to Google with their Gmail accounts. Then, clicking the Get reCAPTCHA button will add the websites to the page to be opened. Label section is given a name by users. In the Domains section, only one website address is entered on each line as site.com and then the Register button is clicked. Here, Site Key and Secret Key screen opens and each one has special codes for the web page. Then, with these codes, the plugin settings section is ready for arrangement.
Step 3 – Google reCAPTCHA plugin settings: In the settings section, Enable reCAPTCHA for part is the part that determining where the plugin will be active in. It is activated in the Site Login, Comment Section, Registration Form and Password Reset sections. After this activation, who should see it in the comment section of the plugin will be set. Go to Options in the “hide RECAPTCHA in Comments form for” section settings and select Admin, editor, content provider, subscriber, author.
Version 2 is selected for reCAPTCHA. Because this version is more useful when visitors are considered. It is also possible to change the look of the plugin from the “reCAPTCHA them” section.
Step 4 – Test: A test is done to see if the security configuration is working. For this, there is a test button under the Site and Secret Key keys. If the test is successful, the code in the right component is put at the bottom of the communication page.
Website owners who make these operations will protect their sites from bot users and spam comments. This plugin prevents bots from seeing the site, registering and making spam comments with the I’m not a robot reCAPTCHa icon in the login, registration form and comments sections. Your site will be more reliable and clean with this plugin.


